Growing your own greens indoors is one of the simplest ways to reduce grocery costs while improving the quality of what you eat. The average U.S. household spends over $600 per year on leafy greens, yet most of that produce loses up to 50% of its nutrients within a week of harvest. By growing indoors, you can harvest fresh greens exactly when you need them, directly in your kitchen.
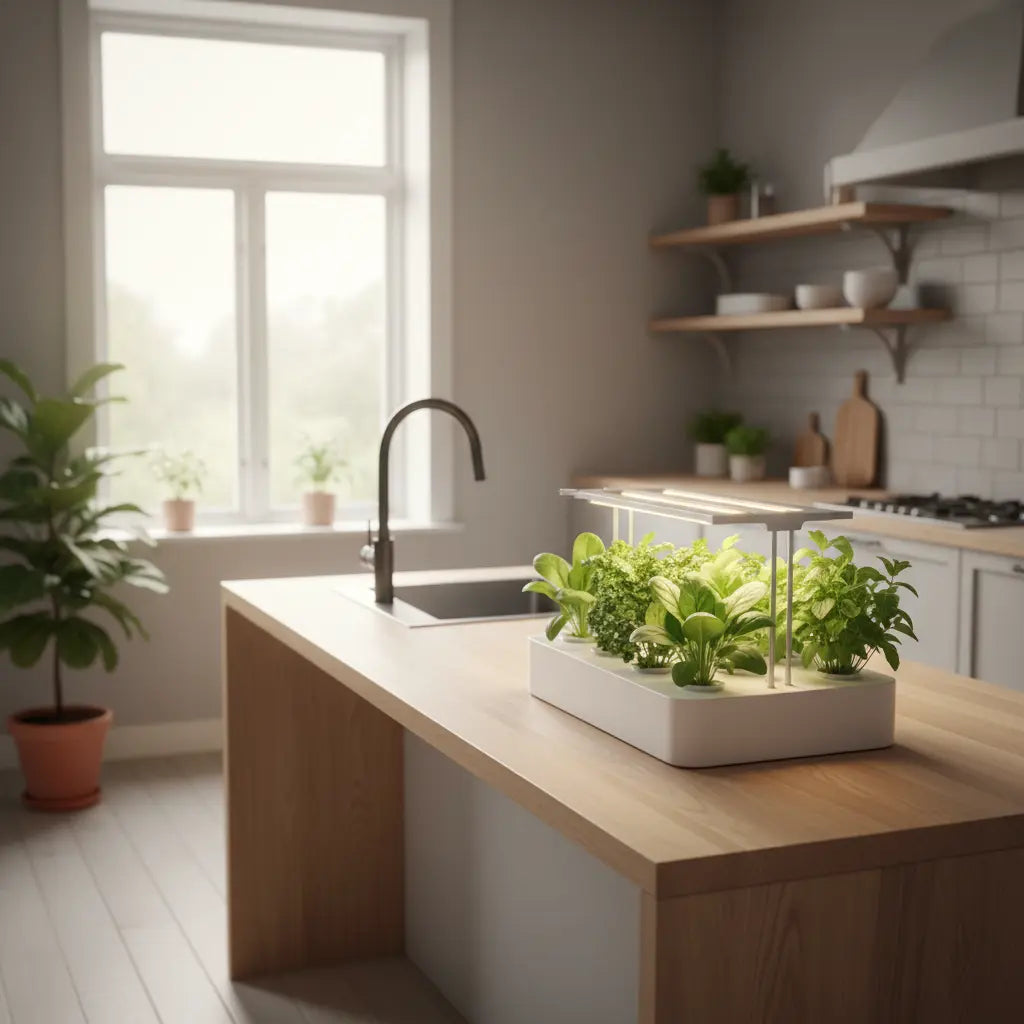
For beginners, the biggest advantage is how easy the process has become. You don’t need outdoor space, you don’t need to deal with soil, and you don’t need any prior gardening experience. Many people today start with INDOOR GARDEN KITS or PRE-SEEDED GROW MEDIUMS, which remove the complexity and allow you to focus only on adding water and light.
Indoor growing also eliminates some of the most frustrating parts of traditional gardening. There is no bending over garden beds, no exposure to pesticides, and no need to deal with insects or unpredictable weather. Everything happens at countertop level, in a clean and controlled environment that fits into your daily routine.
For people living in apartments or busy households, this means you can grow fresh food without adding extra work. Instead of spending time maintaining a garden outside, you spend just a few minutes per day maintaining a small indoor setup that produces consistent results.
Key advantages of growing greens indoors:
- Fresh harvest in 7–21 days depending on plant type
- Up to 30–50% cost savings compared to store-bought greens over time
- No pesticides or chemical treatments
- No soil mess, mold, or fungus gnats
- Year-round production regardless of climate
Because of these advantages, indoor growing is not just more convenient—it is more predictable, cleaner, and significantly easier for beginners to succeed.
Easiest Greens You Can Grow Indoors
Choosing the right plants is the difference between success and frustration when growing indoors. Some greens grow fast, tolerate indoor conditions well, and produce consistent results even with minimal experience. These are the plants that make indoor growing feel easy from the start.
The best strategy is to begin with fast-growing, resilient greens that don’t require deep roots or complex care. Many beginners see their first results in under 10 days, which builds confidence and makes it easier to continue.
Best greens to grow indoors
(beginner-friendly)
- Arugula – Ready in 10–14 days, fast growth and strong flavor, one of the easiest greens to maintain
- Kale (Mamba or Frisé Rouge) – Harvest in 14–21 days, highly resilient and regrows well after cutting
- Spinach – Nutrient-dense and reliable, typically ready in 14–21 days indoors
- Tatsoi – Compact, fast-growing, ideal for small spaces and consistent yields
- Chard (Gold or Firebird) – Produces colorful, fast-growing leaves and tolerates indoor conditions well
These greens are ideal because they provide a balance between speed, yield, and simplicity. Once established, you can harvest multiple times from the same plant, which increases overall output without additional effort.
Fastest option: microgreens
(best for beginners)
If you want the fastest possible results, microgreens are the easiest entry point. Unlike full plants, they are harvested at an early stage, which dramatically reduces growing time.
- Radish microgreens – Ready in 5–7 days, one of the fastest-growing options
- Broccoli microgreens – Mild flavor, high nutritional value
- Pea shoots – Slightly slower (10–14 days) but produce larger yields
These are especially useful if your goal is to quickly replace store-bought greens. Many people start here because it guarantees early success with very little effort.
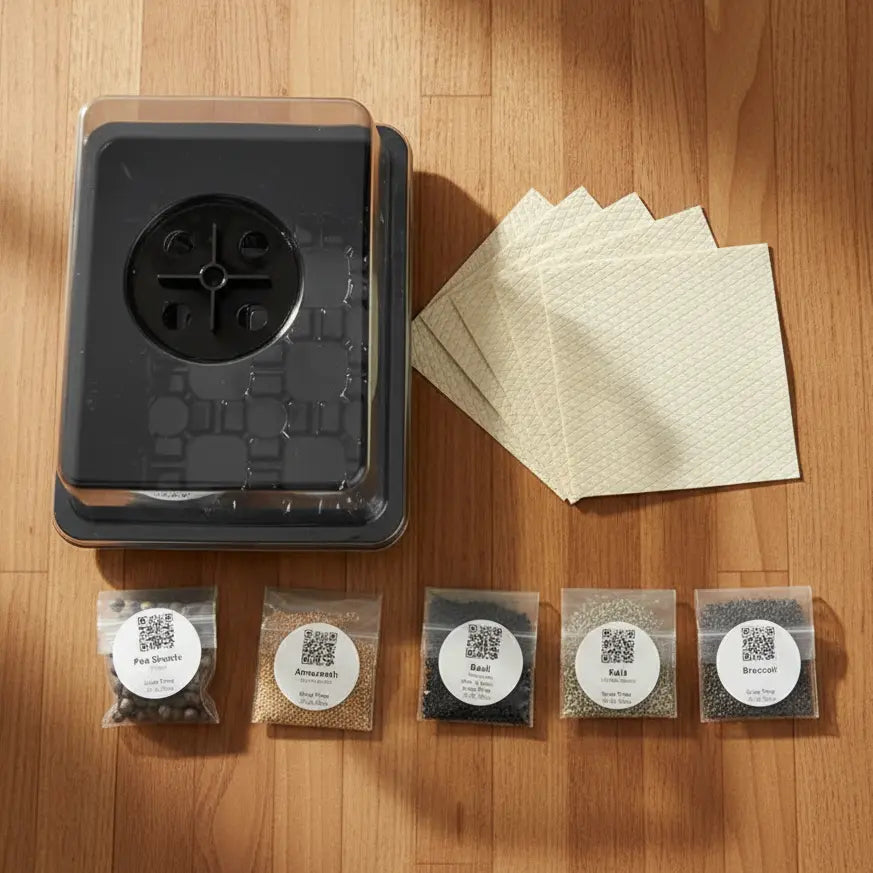
You can simplify the process even further by using PRE-SEEDED GROW MEDIUMS, which remove the need for measuring seeds, spacing, or setup. This makes results more consistent, especially for beginners.
Easy herbs to grow indoors
In addition to leafy greens, herbs are a great way to add flavor and variety to your indoor setup. One of the best options to start with is:
- Lemon basil – Fast-growing, aromatic, and ready for use in 2–3 weeks
Herbs complement leafy greens well because they require similar conditions and can be grown alongside them in the same setup.
Why these plants work best indoors
- Short growth cycles (5–21 days)
- High success rate for beginners
- Compact growth (ideal for kitchens and small spaces)
- Continuous harvest potential
Starting with these plants allows you to see results quickly, which is the most important factor in staying consistent and scaling your setup over time.

Step-by-Step: How to Start Growing Indoors
Getting started with indoor growing is not about having the perfect setup from day one. The most effective approach is to start simple, get quick results, and then scale gradually. This reduces failure, builds confidence, and allows you to learn without wasting time or money.
Most beginners who succeed follow a three-step progression: fast results first, then consistent production, and finally scaling into a reliable source of fresh greens.
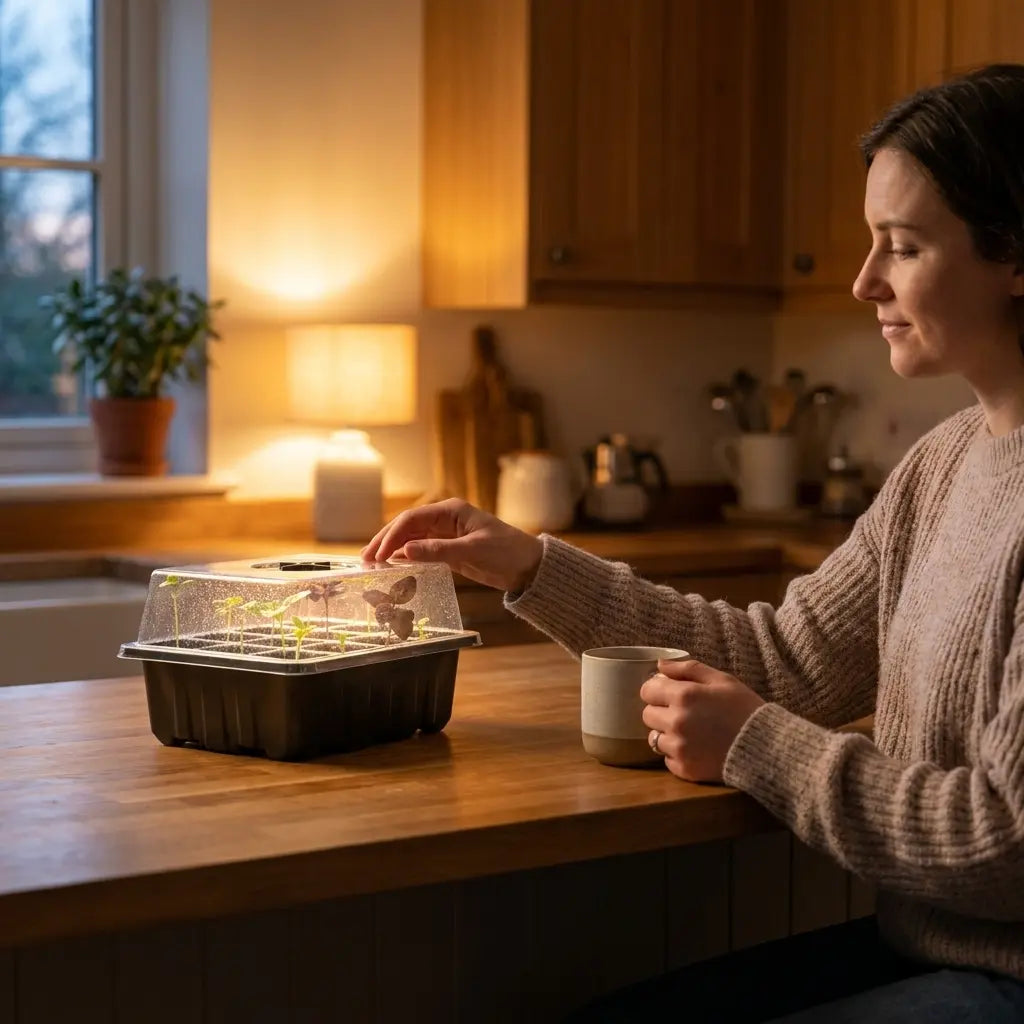
Step 1 – Start Simple and Get Fast Results
The fastest way to succeed is to start with plants that grow quickly and require minimal setup. Microgreens and simple herbs are ideal because they can be ready in as little as 5–10 days, giving you immediate feedback that your setup is working.
At this stage, simplicity is critical. Many beginners fail because they overcomplicate the process with incorrect spacing, watering, or seed amounts. This is why many people start with INDOOR GARDEN KITS or PRE-SEEDED GROW MEDIUMS, where the setup is already optimized and the only inputs are water and light.
This approach reduces early mistakes by up to 80% compared to starting from scratch and significantly increases the chance of a successful first harvest.
Step 2 – Transition to Leafy Greens
Once you’ve had a successful first harvest, the next step is to move to slightly larger greens such as arugula, kale, or spinach. These plants take a bit longer (typically 14–21 days), but they produce more volume and can often be harvested multiple times.
At this stage, consistency becomes more important than speed. You begin to develop a routine, such as watering once per day and maintaining stable light conditions. This is where indoor growing starts to feel predictable rather than experimental.
Step 3 – Scale to Continuous Harvest
If your goal is to reduce grocery spending or have a steady supply of fresh greens, you eventually need to move beyond single batches and into continuous production.
This means growing multiple plants at the same time so that while one batch is ready for harvest, another is still growing. With proper spacing and timing, this creates a cycle where you can harvest fresh greens every week instead of every few weeks.
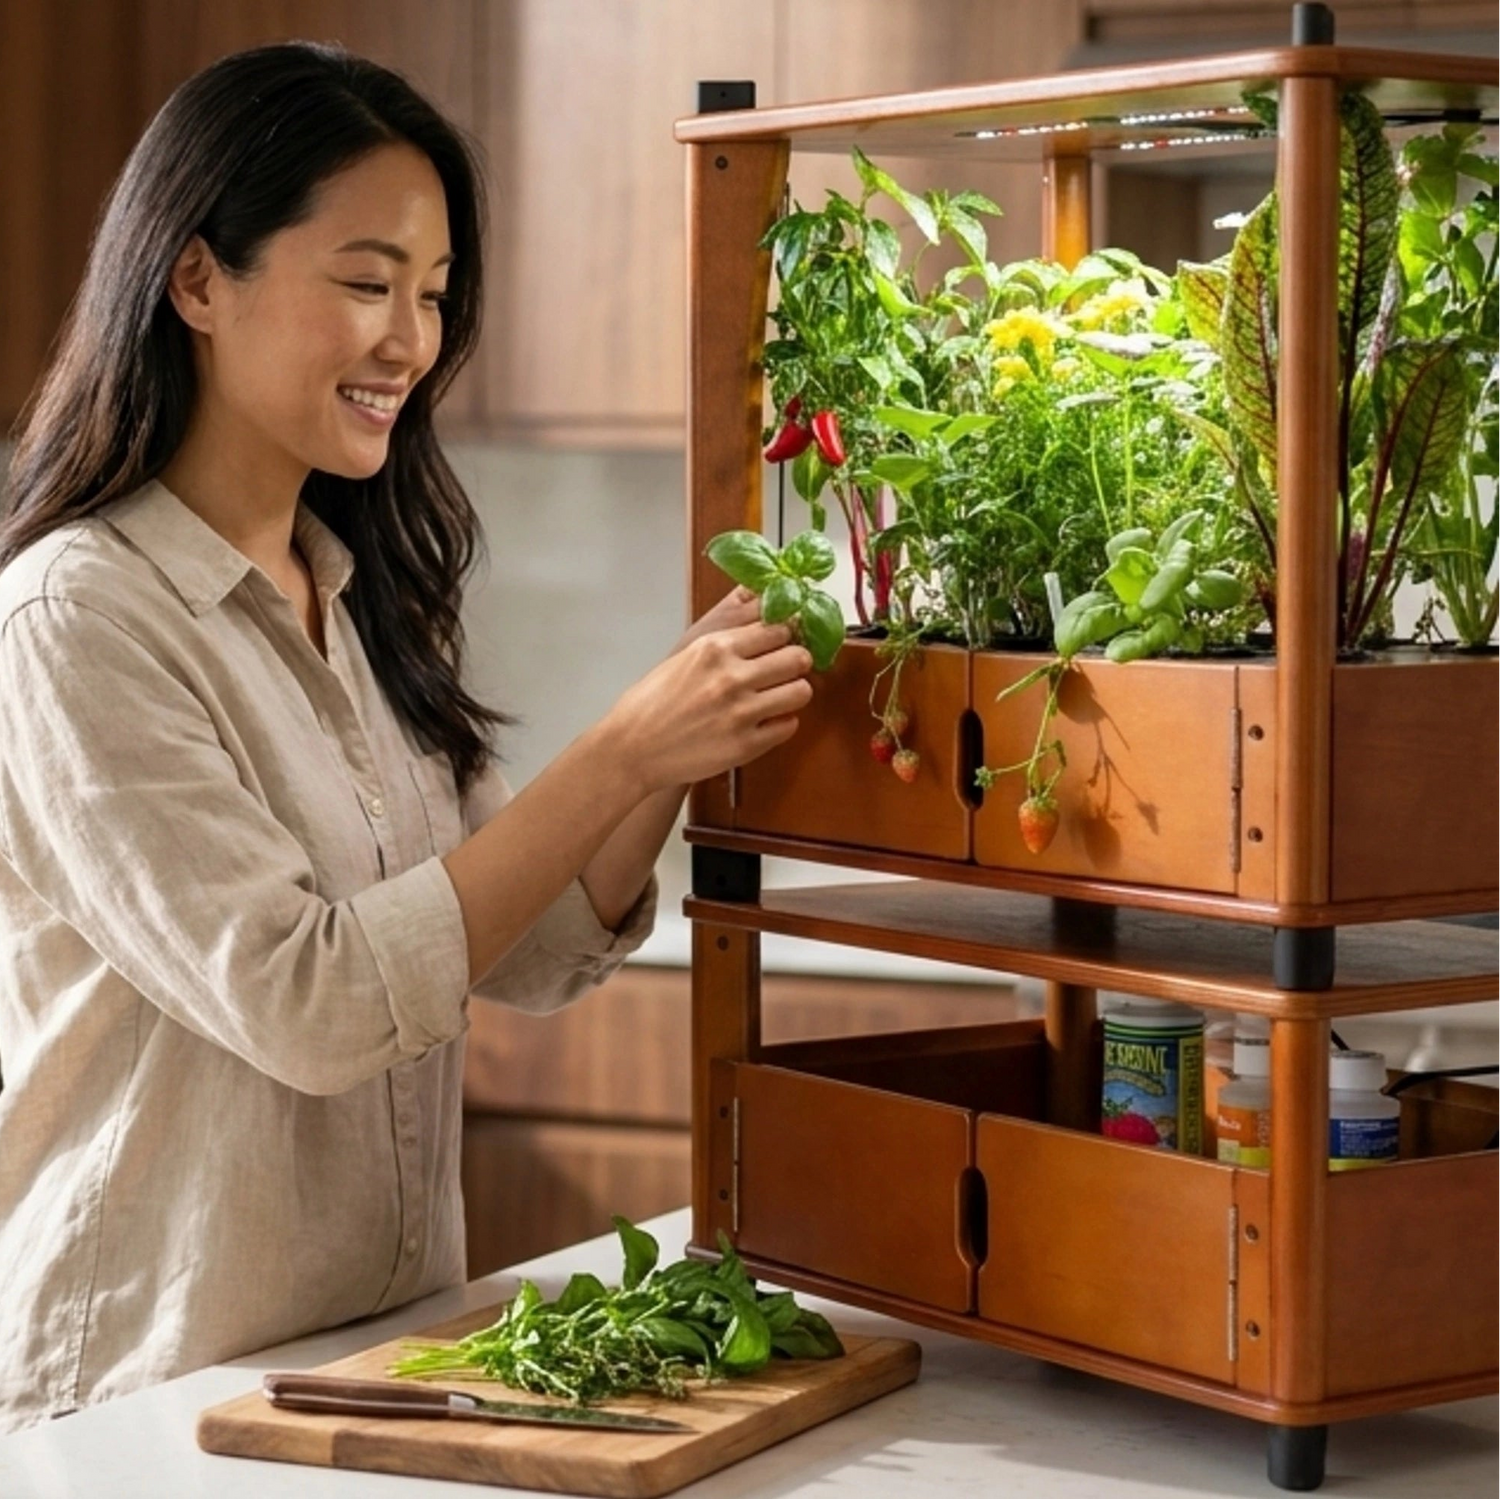
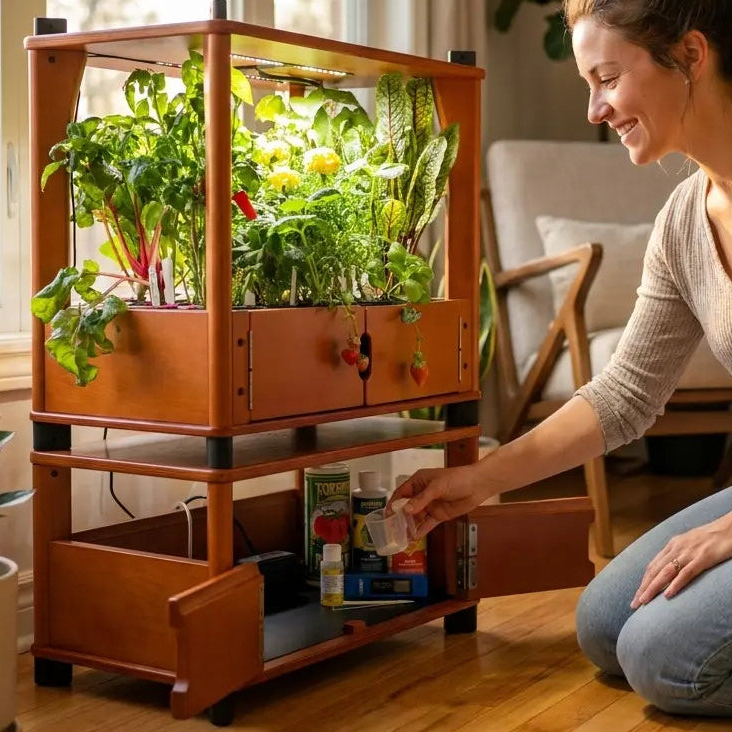
This is where larger systems become useful. A well-designed indoor setup can support multiple trays or plant sites simultaneously, allowing you to grow significantly more food in the same space. Many people transition to setups like a HOME FARM at this stage to maintain a consistent and scalable supply.
Why this step-by-step approach works
- Reduces failure rate in the first 2 weeks
- Builds confidence through quick results (5–10 days)
- Transitions naturally into higher-yield systems
- Allows gradual investment instead of upfront cost
By following this progression, you avoid the most common beginner mistakes and move from occasional success to a reliable, repeatable system for growing food indoors.

Choosing the Right Setup (Beginner to Advanced)
The setup you choose has a direct impact on how easy the process feels and how much food you can realistically grow. Most people don’t fail because growing is difficult—they fail because their setup is either too complicated or not designed for indoor conditions.
A good indoor setup should minimize effort, reduce variability, and make results predictable. The goal is not to build the most advanced system, but to choose the simplest setup that delivers consistent results.
The three main types of indoor growing setups
- Basic setup (DIY approach) – trays, loose seeds, and a light source
- Starter setups (beginner-friendly systems) – simplified, ready-to-use solutions
- Advanced systems (scalable production) – designed for continuous harvest and higher output
Each option has its place, but the key is choosing the right starting point based on your experience and goals.
Option 1 – Basic DIY setup
This approach typically involves buying trays, seeds, and figuring out spacing and watering on your own. While it has the lowest upfront cost, it often comes with the highest failure rate for beginners.
Common issues include uneven growth, overwatering, and incorrect seed density. Without prior experience, it can take multiple attempts to get consistent results.
This setup works best if you already have some gardening experience or are willing to experiment.
Option 2 – Starter setups (best for beginners)
Starter setups are designed to remove complexity and make the process straightforward from day one. Instead of assembling everything yourself, you use systems where spacing, airflow, and structure are already optimized.
This is where products like INDOOR GARDEN KITS come in. They reduce setup time from hours to minutes and significantly improve first-time success rates. Many beginners also combine these with PRE-SEEDED GROW MEDIUMS to eliminate the need for measuring and handling seeds entirely.
As a result, the process becomes simple: add water, provide light, and wait for growth. This dramatically increases consistency and reduces the chances of early failure.
Option 3 – Advanced indoor systems (scaling production)
Once you want to grow more than just occasional batches, you need a setup that supports multiple plants at the same time. This allows you to create a continuous growing cycle instead of restarting from scratch after each harvest.
Advanced systems are designed for efficiency and output. They maximize space, improve airflow, and allow you to manage multiple trays or plant sites simultaneously.
At this stage, many growers move to systems like a HOME FARM, which enables consistent weekly harvests and significantly higher production compared to small setups.
How to choose the right setup
- If you are just starting → keep it simple and focus on quick results
- If you want consistency → use optimized starter systems
- If you want to replace store-bought greens → scale to a larger setup
The biggest mistake is starting too complex. A simple setup that works is always better than an advanced setup that fails.
By choosing the right setup from the beginning, you reduce trial and error, save time, and move faster toward a reliable indoor food source.
Common Mistakes When Growing Greens Indoors
Most people who struggle with indoor growing are not failing because it is difficult—they are running into a small number of predictable mistakes. The good news is that once you understand these issues, they are very easy to avoid, and fixing them can improve your success rate almost immediately.
Indoor growing is a controlled environment, which means small errors can have a bigger impact. The goal is to remove as many variables as possible so that your plants can grow consistently with minimal effort.
The most common beginner mistakes
- Overwatering – the most frequent issue, leading to root rot or mold within just a few days
- Using soil indoors – creates mess, attracts pests, and often causes fungus gnats
- Insufficient light – slows growth by up to 50% and produces weak, thin plants
- Inconsistent watering schedule – leads to uneven growth and lower yields
- Incorrect seed density – overcrowding reduces airflow and increases failure risk
These problems are responsible for the majority of failed attempts, especially in the first two weeks of growing.
Why these mistakes happen
Most beginners try to replicate outdoor gardening indoors, which introduces unnecessary complexity. Soil behaves differently in indoor conditions, water evaporates more slowly, and airflow is more limited. As a result, methods that work outside often fail inside.
For example, overwatering can damage plants in as little as 48–72 hours indoors, while poor lighting can double the time it takes to reach harvest. These issues are not always obvious at first, which is why many beginners become frustrated before they see results.
How to avoid these issues completely
The easiest way to eliminate most of these problems is to simplify the process. Using PRE-SEEDED GROW MEDIUMS removes the need to measure seeds or manage spacing, which prevents overcrowding and improves airflow. It also helps control water retention, reducing the risk of overwatering.
Similarly, structured setups such as INDOOR GARDEN KITS are designed to balance airflow, spacing, and support, which reduces variability between batches. Instead of troubleshooting multiple variables, you reduce the process to just a few consistent actions.
The impact of avoiding these mistakes
- Faster growth cycles (often 5–7 days faster for microgreens)
- Higher success rates in the first attempt
- More uniform and predictable harvests
- Less maintenance time (often under 5 minutes per day)
When these common mistakes are removed, indoor growing becomes significantly easier and more reliable. Instead of trial and error, you move into a repeatable process that produces consistent results every time.

How Much Food Can You Actually Grow Indoors?
One of the biggest misconceptions about indoor growing is that it only produces small amounts of food. In reality, even a compact setup can generate a steady supply of fresh greens if it is used consistently and scaled correctly.
The key factor is not the size of a single harvest, but how often you can harvest. Indoor growing allows you to operate on continuous cycles, which means you are producing food every week instead of relying on occasional yields like in outdoor gardening.
What you can realistically expect
A small indoor growing setup can produce more than enough greens for regular use, especially when you grow plants in parallel and harvest them at different times.
- 1–2 plants → approximately 2–3 servings per week
- 3–5 plants → enough for regular salads throughout the week
- 6–10 plants → consistent daily portions for one person
- Larger setups (10+ plants) → reliable weekly supply for a household
Because most leafy greens grow within 14–21 days, you can stagger planting times to create a continuous harvest cycle. For example, starting a new set of plants every 5–7 days ensures that something is always ready to harvest.
Why indoor growing is more efficient than it seems
Unlike outdoor gardening, indoor systems are not affected by seasons, pests, or weather delays. This means your yield is more predictable and your production timeline stays consistent year-round.
In addition, harvesting indoors reduces waste. Store-bought greens often spoil within a few days, while home-grown greens are harvested fresh, meaning you only take what you need. This can reduce food waste by 20–40%, depending on usage.
Scaling from occasional harvest to daily supply
The transition from “sometimes growing” to “reliable food source” happens when you move from single batches to overlapping growth cycles.
This is where larger systems become valuable. A setup like a HOME FARM allows multiple plants to grow simultaneously, making it possible to maintain a steady rotation of planting and harvesting without restarting the process each time.
At the same time, many growers continue using PRE-SEEDED GROW MEDIUMS to keep the process consistent and reduce preparation time, especially when managing multiple plants at once.
What this means for your kitchen
With the right setup and routine, indoor growing can realistically replace a portion of your grocery shopping. Instead of buying greens every week, you maintain a small, controlled system that produces fresh food continuously.
The result is not just convenience—it is control over quality, freshness, and cost, all within a space as small as a kitchen countertop.
Final Thoughts: Start Small, Grow More
The easiest way to begin is to keep things simple and focus on getting your first successful harvest. Once you see results, it becomes much easier to build consistency and expand over time.
Most people start with simple solutions like INDOOR GARDEN KITS or PRE-SEEDED GROW MEDIUMS to eliminate guesswork and get reliable results from the beginning. From there, scaling into a larger setup such as a HOME FARM allows you to move from occasional growing to a steady, dependable supply of fresh greens.
The goal is not to build a perfect system immediately, but to create a process that works consistently. With the right approach, even a small indoor space can become a reliable source of fresh, organic food throughout the entire year.


0 comments