If Thanksgiving is November 27, your planting date is November 13. That's the entire growing schedule for microgreens.
Most first-time growers assume fresh food takes months. Microgreens don't — they're harvested 7 to 14 days after planting, which makes them one of the only crops you can grow in a kitchen and time to an exact date on the calendar. Grow microgreens at home and you have a fresh harvest ready for the table without planning further out than two weeks.
This guide gives you everything you need: the best varieties to grow for Thanksgiving, the day-by-day care timeline, and what to do the morning of the holiday when it's time to harvest.
Why Microgreens Are the Best Thing a First-Time Grower Can Start With
Almost every “grow your own food” project runs into the same problem: the timeline. Tomatoes take three to four months. Herbs take two to four weeks just to germinate. Vegetables need a full growing season. Most people who try once and give up did so because the gap between planting and eating was too long to stay motivated.
Microgreens don't have this problem. They germinate in two to three days and are harvest-ready in one to two weeks — faster than almost any other food crop. And because you're growing indoors on a windowsill, there's no outdoor space, no soil mixing, and no waiting for the right season.
For Thanksgiving specifically, the timing is almost suspiciously convenient. Most microgreens reach peak harvest right at the 10 to 14 day mark — which means a mid-November planting lands exactly at the holiday. It's the one food project that actually fits the schedule.
The 5 Best Varieties to Grow Microgreens for Thanksgiving
Not all microgreens finish at the same speed. Here are the five varieties best suited for a Thanksgiving harvest, ranked by how fast they're ready.
| Variety | Days to Harvest | Flavor | Plant By (for Nov 27) |
|---|---|---|---|
| Radish Confetti | 5–7 days | Peppery, spicy | November 20 |
| Mustard | 7–10 days | Bold, spicy | November 17 |
| Pea Shoots | 8–12 days | Sweet, mild | November 15 |
| Amaranth Garnet Red | 8–12 days | Mild, earthy | November 15 |
| Sunflower | 10–14 days | Nutty, crunchy | November 13 |
If you're growing all five, plant them all on November 13 and they'll all be ready by Thanksgiving week. Radish will be ready first — a nice built-in test run — and sunflower will finish right on schedule.
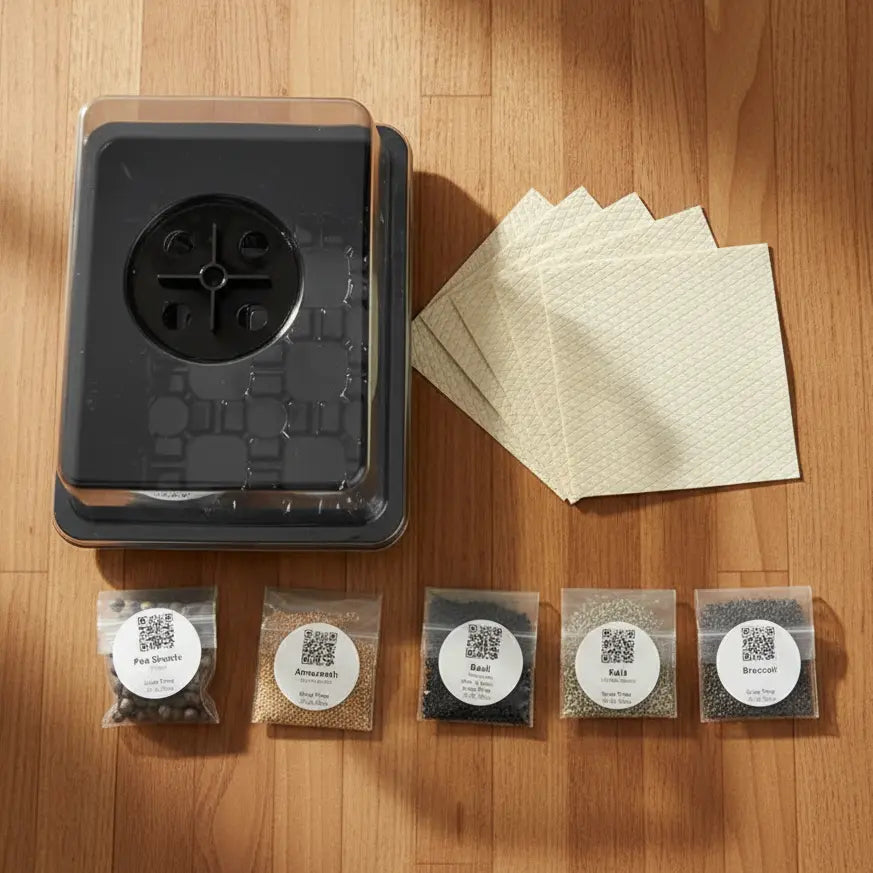
Each of these varieties is available in the Aquager microgreens catalog, and all include an organic grow mat so you can plant the day the order arrives:
- Radish Confetti Mix Microgreens Seeds — ready in 5–7 days
- Mustard Microgreens Seeds — ready in 7–10 days
- Pea Shoots Field Microgreens Seeds — ready in 8–12 days
- Amaranth Garnet Red Microgreens Seeds — ready in 8–12 days
- Sunflower Black Oil Microgreens Seeds — ready in 10–14 days
If you want to start with just one variety, The 5 Fastest-Growing Microgreens (Harvest in 7 Days or Less) can help you decide which one to plant first.
Your 14-Day Thanksgiving Countdown: Day by Day
Here's the full care timeline from planting day to harvest. Each step takes under five minutes.
Day 1 — Plant (November 13)
Rinse your grow mat and press it flat into the tray. Scatter seeds evenly across the surface — dense but not stacked. Mist with water until the mat is fully damp. Place the humidity dome on top and set the tray somewhere dark and room-temperature: a cabinet, pantry shelf, or under the counter works well.
Days 1–3 — Germination
Leave the dome on. Lift it once a day to mist and check moisture. You'll start seeing white root threads within 24 hours and small green or purple shoots by day two or three. Keep it dark — this encourages the shoots to reach for light before you expose them.
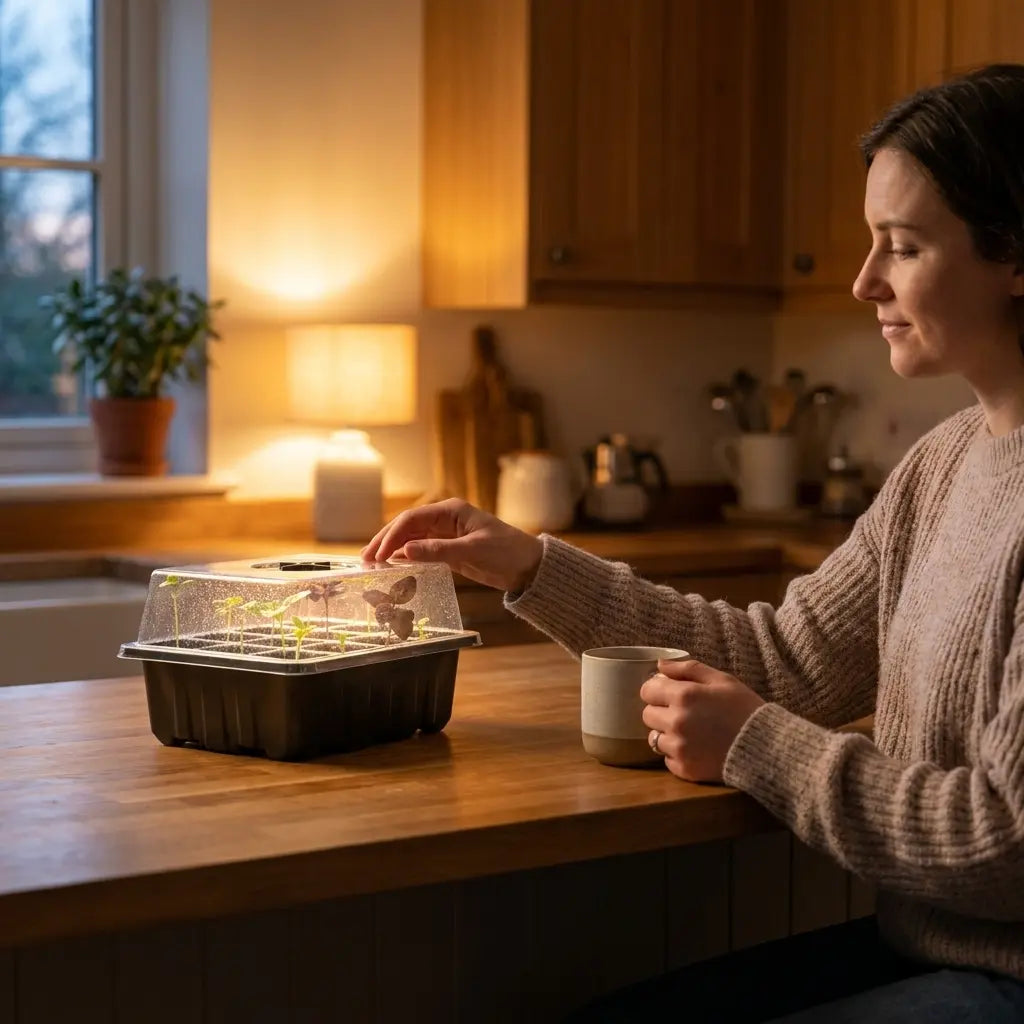
Day 3–4 — Uncover and Move to Light
Once shoots are 1 to 2 inches tall and pushing against the dome, remove it. Move the tray to a bright windowsill — south-facing is best for November, but any window with several hours of daylight works. No grow light needed.
Days 4–10 — The Growing Phase
Water every day or every other day depending on how quickly the mat dries. Pour water directly into the tray below the mat (bottom watering) to keep moisture even and reduce the risk of mold on the surface. Don't water the leaves directly. You'll see noticeable growth every day at this stage.
Days 10–14 — Almost Ready
Leaves will be fully developed, upright, and dense. The cotyledon leaves (the first rounded leaves) are what you're harvesting — you don't need to wait for the true leaves. When growth looks full and the leaves look vibrant, you're ready.
Day 14 — Harvest (November 25–27)
Use clean scissors to cut the shoots just above the mat, about ½ inch from the surface. Rinse gently under cold water, pat dry, and refrigerate in an airtight container lined with a damp paper towel if you're not using them that day.
For a complete guide to harvesting without losing your crop, see How to Harvest Microgreens the Right Way (Without Wasting Your Crop).
The Easiest Way to Set Up a Microgreens Growing Kit at Home
The most common reason a first grow fails isn't the seeds or the care — it's the wrong container. A flat container with no drainage leads to waterlogged roots; a container that's too shallow dries out before seeds can germinate. The tray and grow mat combination matters more than most people expect.
The Aquager Microgreens Starter Kit is built for exactly this workflow: a vented growing tray, a properly sized humidity dome for the germination phase, and an organic grow mat that holds moisture evenly across the whole surface. It's the setup that removes the variables beginners typically guess at — container depth, drainage, moisture retention — and replaces them with one kit that works out of the box.
Add seeds, water, and a windowsill. That's it. The kit costs $24.99 and runs multiple grows — you re-use the tray and dome each time, adding a new grow mat and seeds for subsequent harvests.
Frequently Asked Questions
Do I need a grow light to grow microgreens for Thanksgiving?
No. Microgreens grow fine on a bright windowsill with natural light. A south-facing window is ideal for November, but east or west-facing windows work too. You'd only need a grow light if you have no windows or very limited natural light — which is unusual in a home kitchen.
What if my seeds don't sprout within 3 days?
Check two things: moisture and temperature. The grow mat should be damp but not sitting in water. Room temperature should be between 65°F and 75°F — too cold and germination slows significantly. If you're in a cold house, try moving the tray to a warmer spot (on top of the refrigerator works well) during germination.
Can I grow multiple varieties in the same tray?
It's better to keep varieties in separate trays since germination and harvest timing differ. That said, running two or three trays side by side on a windowsill is easy — they don't take up much space, and harvesting them at different times spreads out the fresh supply through the week.
How do I know when microgreens are ready to harvest?
Look at the cotyledon leaves — the first rounded leaves that appear after the shoot straightens out. When those are fully open and the growth looks dense and upright, it's time. You don't need to wait for the true leaves (the second set). For most varieties on this list, that's day 7 to 14.
What if I miss the window and they grow too long?
Microgreens that grow past their peak get leggy and lose flavor intensity, but they don't become inedible. If you plant on November 13 and forget to harvest for a few extra days, they'll still be usable — just trim the bottoms and use them. The flavor might be slightly less concentrated but still worth eating.
Plant November 13. Harvest Thanksgiving Week.
Growing microgreens for Thanksgiving doesn't require experience, outdoor space, or anything more than a windowsill and two weeks. Plant on November 13 and you'll have five fresh varieties ready to put on the table — grown at home, harvested that morning, and tasting like nothing you can buy at a store the week of the holiday.
The Aquager Microgreens Starter Kit has everything you need to start today. If this is your first grow, Microgreens for Beginners: How to Start Growing Indoors in 7 Days walks through the complete setup process from start to finish.
Author: Aquager · Published: June 7, 2026 · Updated: June 7, 2026


0 comments