Your outdoor garden has slowed down. The tomatoes are gone, the basil has bolted, and the patio planter is sitting empty. But your kitchen counter doesn't have to follow suit.
Microgreens are one of the few crops that actually thrive in fall and winter conditions. They don't need outdoor soil, warm temperatures, or long days of sunshine. A windowsill, a tray, and a few seeds is all it takes to keep fresh, nutrient-dense greens growing all season long.
This guide covers everything you need to grow microgreens through fall and winter: which varieties handle cool indoor temperatures best, how to manage light when the days get shorter, and how to stagger your plantings so you're never without a harvest.
Why Fall and Winter Are Ideal for Growing Indoor Microgreens
Most vegetables struggle when temperatures drop and daylight shrinks. Microgreens don't.
Because they're grown indoors — on a countertop, a kitchen shelf, or a windowsill — they're completely insulated from seasonal changes outside. The grow cycle is so short (7–14 days for most varieties) that light and temperature fluctuations have almost no effect on the outcome.
In fact, fall and winter offer one underrated advantage: cooler indoor temperatures. Many microgreens — including broccoli, kale, pea shoots, and radish — actually prefer slightly cooler conditions. They germinate cleanly, grow steadily, and hold up longer after harvest when the air isn't as warm.
The only real adjustment to make in winter is light management — and that's a simple fix covered below.
The 5 Best Microgreens for Fall and Winter Growing
Not all microgreens are equally suited to cooler, lower-light conditions. These five varieties consistently perform best through fall and winter.
1. Broccoli Microgreens — The Cold-Season Superfood
Broccoli microgreens are one of the most cold-tolerant varieties you can grow indoors. They germinate reliably at room temperature (65–72°F), reach harvest in 8–10 days, and pack more sulforaphane per serving than almost any other food. They're mild in flavor — slightly earthy, lightly spicy — and work well in soups, grain bowls, and sandwiches through the cooler months.
For the full nutritional case, see our guide on the most nutritious microgreen varieties. Broccoli Microgreens Seeds — $3.99, organic grow mat included.
2. Pea Shoots — Sweet, Fast, and Beginner-Friendly
Pea shoots thrive in cooler temperatures. In warmer weather they can become leggy; in fall and winter they grow tight, upright, and sweet. They're also the most forgiving microgreen for beginners — large seeds that germinate fast, with visible progress every day.
Harvest time: 8–10 days. Flavor: sweet, fresh, slightly grassy. Uses: salads, grain bowls, soups, stir-fries. Pea Shoots Field Microgreens Seeds — $3.99, organic grow mat included.
3. Radish Confetti Mix — Fastest Harvest of the Season
Radish is the fastest microgreen you can grow — ready in 5–7 days, even in winter. The Confetti Mix produces a colorful blend of red, purple, and white stems with a bold, peppery bite. Cold temperatures actually intensify the color of radish microgreens, so you'll often get a more vibrant display in winter than in summer.
4. Kale Kalefetti Mix — Nutrition and Color Through the Cold Months
Kale microgreens are built for fall. Rich in vitamins K, C, and folate, they tolerate lower light levels without becoming leggy, and the Kalefetti variety produces a beautiful multi-color mix. Harvest time: 8–12 days. Flavor: mild and earthy — far gentler than mature kale. Perfect for smoothies, soups, and as a garnish on warm fall dishes.
5. Clover — The Mildest, Most Versatile Winter Green
Clover microgreens are ultra-mild in flavor — almost neutral — which makes them the easiest variety to add to any meal without changing the taste. They're also one of the densest-growing microgreens, producing an impressive yield for a small seed count. A great low-effort winter crop.
How to Manage Light When Growing Microgreens Indoors in Winter
Light is the one variable that needs attention in fall and winter. Shorter days mean fewer hours of natural light, which can lead to leggier, weaker microgreens if you don't account for it.
Natural light works — if you have a bright south-facing window. In fall and winter, a south-facing windowsill can still provide 4–6 hours of decent indirect light. For fast-growing varieties like radish and pea shoots, this is often enough.
East or west-facing windows need supplemental light. If your best window faces east or west, your microgreens may lean toward the light and grow more slowly. Rotating the tray daily helps with the lean; a basic LED grow light on a timer fills in the missing hours.
A simple LED grow light solves everything. You don't need a complex setup. A basic LED strip or desk-style grow light placed 4–6 inches above the tray for 12–14 hours per day will outperform even a good winter windowsill. Most microgreens don't need high-intensity full-spectrum lighting — they just need consistent light during the greening phase (Days 4–7 after germination).
The most common winter growing mistake is insufficient light during the greening stage. Keep the tray covered during the dark germination phase, then expose it to maximum available light as soon as seeds break the surface.
How to Stagger Your Plantings for a Continuous Microgreens Harvest
One of the best advantages of growing microgreens indoors is that you can set up a simple rotation and have fresh harvests on a reliable weekly schedule through the entire fall and winter.
The concept is straightforward: start a new tray every 5–7 days. By the time your first tray is ready to harvest (Day 7–10), your second tray is at the mid-growth stage and your third is just germinating. After cutting the first tray, clean it, add a fresh grow mat, and seed it again.
With three trays running at once, you harvest every week. With five trays, you harvest twice a week. The consistent indoor environment of fall and winter makes this system especially reliable — your timing becomes predictable in a way that outdoor seasonal growing never is.
The Right Setup for Year-Round Indoor Microgreens
If you want to grow microgreens consistently through fall and winter without troubleshooting, setup matters as much as seed selection. Three things make the biggest difference.
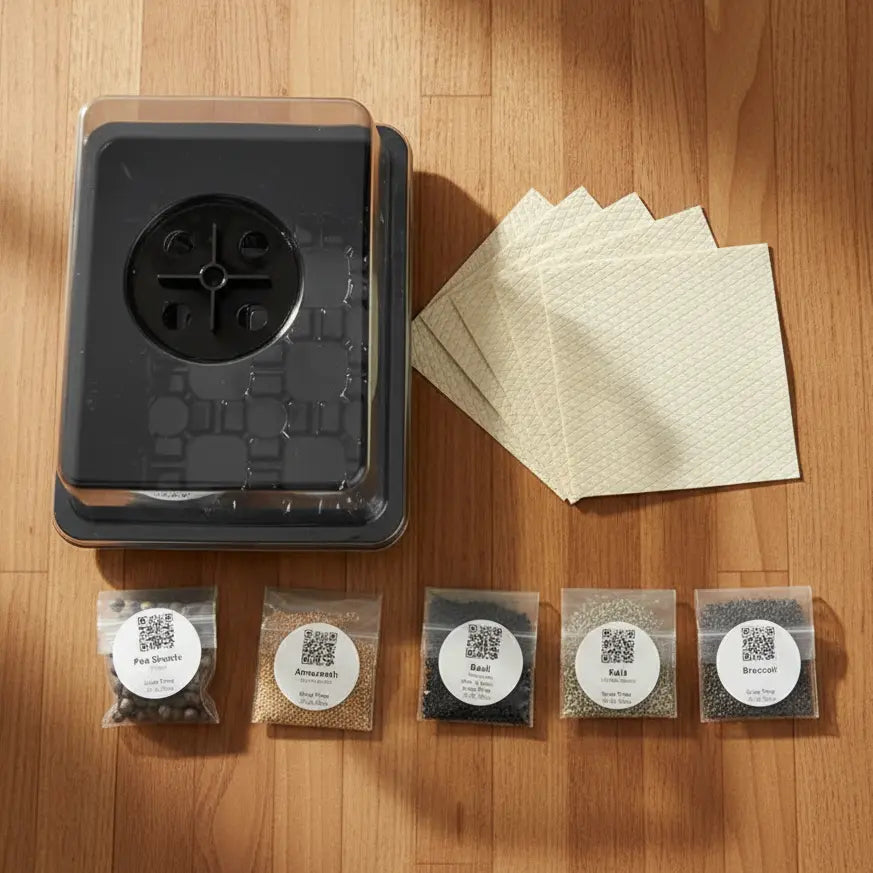
Growing medium: Organic coco coir grow mats are ideal for indoor microgreens. They hold the right amount of moisture, eliminate drainage guesswork, stay clean on a countertop, and are replaced between each grow — keeping your setup sanitary through multiple cycles.
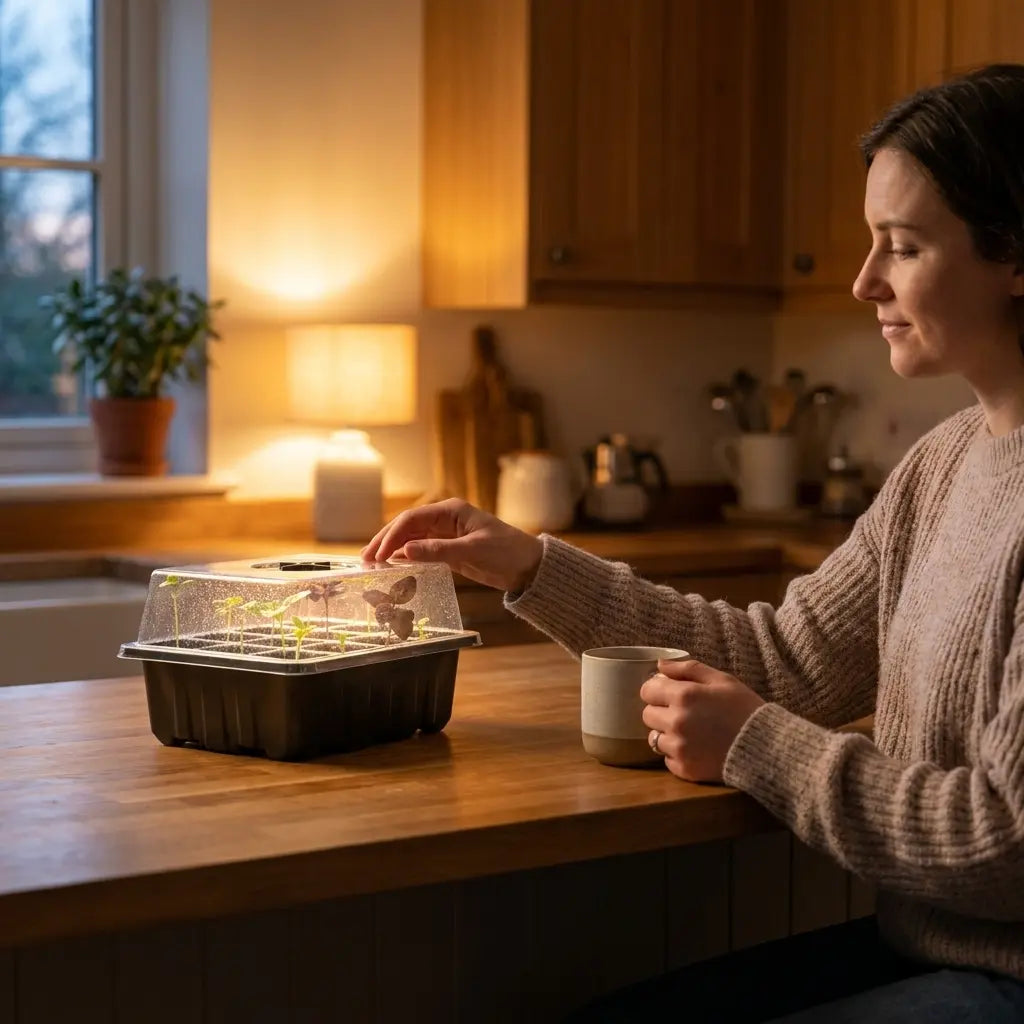
Humidity dome: A dome over the seeds during germination (Days 1–4) significantly improves germination rates, especially in the drier heated air of winter homes. Once seeds sprout and break the surface, remove the dome and move the tray into full light.
Bottom watering: Pour water into the tray and let the grow mat absorb it from below. This is more effective than overhead watering and greatly reduces the risk of mold — a more common issue in closed winter homes with lower air circulation.
The Microgreens Starter Kit from Aquager includes everything for this setup in one package: a 10×20" growing tray, a humidity dome, and an organic coco coir grow mat. You just add seeds. It's designed specifically for clean, countertop-friendly growing — the exact system described here. For more on the growing method, see our guide to hydroponic microgreens.
Frequently Asked Questions About Growing Microgreens in Winter
Can microgreens grow in a cold apartment?
Yes. Most microgreens germinate and grow well between 60–75°F. Cooler rooms (60–65°F) will slow the grow cycle by a day or two but won't harm the crop. If your home drops below 60°F regularly, place the tray in a warmer part of the room — away from drafty windows but not directly against a heat source.
Do microgreens need sunlight in winter?
They need light, but not necessarily direct sunlight. A south-facing window with 4+ hours of indirect natural light is sufficient for most fast-growing varieties. For north or east-facing windows, a basic LED grow light on a 12-hour timer fills the gap effectively.
How often should I water microgreens in winter?
Once per day is usually enough, but check the grow mat — it should feel damp, not soaked. Winter heating systems create drier indoor air, which can dry the mat faster than expected. Check morning and evening during the first few days until you understand your specific environment.
Can I grow microgreens on a windowsill in December?
Yes, with one caveat: don't leave trays directly against the glass on very cold nights. The glass surface can drop well below room temperature and shock seeds during germination. Set the tray on the sill during the day and move it back to the counter at night when it's below freezing outside.
When should I harvest microgreens in winter?
Harvest at the cotyledon stage — when the two seed leaves are fully open but before the first true leaf appears. In winter the grow cycle may take 1–2 extra days compared to summer. Use leaf stage as your harvest signal, not just the calendar.
Keep Your Kitchen Counter Green All Winter
The short days and cold weather outside don't have to change what you eat. Microgreens grow indoors on a counter, in a tray, completely independent of the season.
Start with one tray this week. Add a second the following week. By the time December arrives, you'll have a rotation running and fresh greens ready to harvest whenever you need them — broccoli for nutrition, pea shoots for sweetness, radish for speed.
The Microgreens Starter Kit has everything you need to start your first fall or winter grow today. Pick up Broccoli or Pea Shoots seeds alongside it and you'll have your first harvest within 10 days of planting.
Author: Aquager | Published: May 30, 2026 | Updated: May 30, 2026


0 comments