The most dramatic microgreen tray you can grow is sunflower. Thick, dark stems. Large, broad cotyledon leaves. A nutty-sweet flavor that doesn't taste like anything else in the microgreens category — satisfying in a way that smaller, more delicate varieties aren't.
Sunflower microgreens are also among the most nutritionally dense options available: high in Vitamin E, B vitamins (thiamine, riboflavin, B6), iron, zinc, and folate. And they have a crunchy, substantial texture that makes them work as a primary element of a dish, not just a garnish.
There is one catch — a technique that most beginner guides completely skip. Without it, you'll get bent, S-curved stems that look nothing like the photos. With it, you get the upright, uniform, visually impressive tray that makes sunflower microgreens worth growing.
Why Sunflower Microgreens Are Worth Growing
Texture. The satisfying crunch from thick stems and broad leaves makes sunflower microgreens one of the few varieties that can function as a primary salad green rather than just a topping. They hold their shape in dressings, under heat, and alongside heavy proteins in a way that delicate varieties don't.
Flavor. Nutty, slightly sweet, with a faint echo of the sunflower seed itself. Approachable enough for people who find other microgreens too green-tasting, interesting enough for experienced growers who want something beyond the standard palette.
Nutrition. Among the highest Vitamin E content of any commonly grown microgreen variety. Also high in magnesium, B vitamins, and iron.
Visual impact. A full harvest tray of sunflower microgreens looks like something from a high-end restaurant. The visual reward is significant and immediate.
The challenge: sunflower seeds are large and heavy. Without the correct technique, they germinate sideways rather than upright, producing bent, uneven stems and seed hulls stuck to the leaves.
What You Need to Grow Sunflower Microgreens
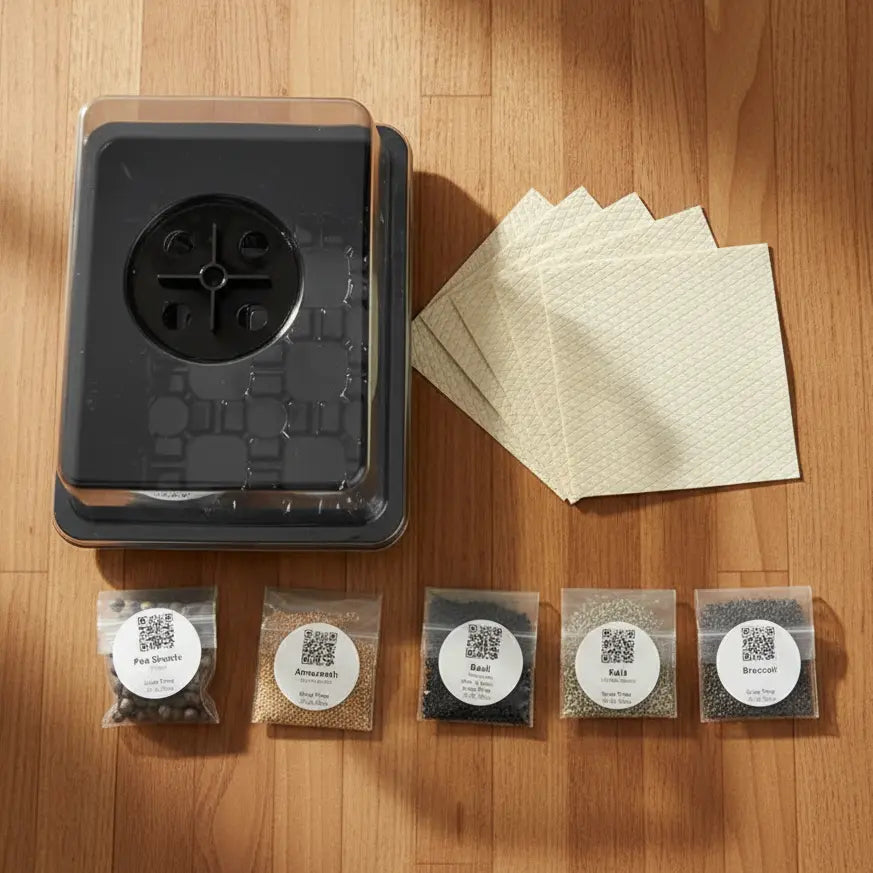
Sunflower microgreen seeds. Use food-grade seeds packaged for sprouting or microgreens — not bird feed or outdoor garden seeds, which may be treated. Aquager's Sunflower Black Oil Microgreen Seeds use the Black Oil Sunflower variety, which produces the densest, most flavorful microgreens. Use approximately 1/2 cup (80–100 grams) per 10x20-inch tray.
A 10x20-inch grow tray with drainage holes, plus a solid-bottom outer tray for bottom watering.
An organic grow mat, pre-cut to the standard tray size.
Something heavy for the blackout phase. This is the essential step. A cutting board with a stack of books on top, a second grow tray filled with bags of rice, or anything that applies 3–5 pounds of consistent downward pressure across the entire tray surface. The weight is what forces straight, upright stems.
Water for soaking. Sunflower seeds require 8–12 hours of pre-soaking before planting.
How to Grow Sunflower Microgreens Step by Step
Step 1 — Soak the Seeds (8–12 Hours)
Place sunflower seeds in a bowl and cover with cool water. Soak for 8–12 hours or overnight. The seeds will absorb water visibly and feel softer. After soaking, drain and rinse thoroughly. Some growers soak twice (8 hours, rinse, 4 more hours) for more consistent germination — optional but effective.
Step 2 — Prepare the Tray and Seed
Wet the grow mat thoroughly until evenly damp throughout. Place flat in the growing tray.
Spread soaked sunflower seeds in a single, dense, even layer across the mat. Seeds should be touching but not piled — one layer deep, covering the mat completely. Use approximately 1/2 cup for a 10x20-inch tray. Mist gently.
Step 3 — CRITICAL: Weighted Blackout Phase (Days 1–5)
This is the step that separates impressive sunflower microgreens from crooked, hull-covered ones.
Place a second tray directly on top of the seeds and load it with weight — a cutting board plus books, or bags of rice. The goal is 3–5 pounds of consistent pressure across the entire tray surface. Cover the whole setup and place in a dark, warm area (70–78°F is ideal).
The weight serves two purposes:
- It forces stems to grow straight upward rather than tipping sideways under their own seed weight.
- It helps push off the hard seed hull as the shoot emerges — without weight, shells often remain attached to the cotyledon leaves throughout the harvest.
Mist once daily if the mat feels dry. By day 3, you'll feel the pressure of the cover rising as sprouts push upward. By day 4–5, thick pale yellow shoots will be pushing hard against the weighted cover.
Step 4 — Remove Weight and Expose to Light (Days 5–7)
When the sprouts are firmly pushing against the weighted cover, remove everything and move the tray to natural light or a grow light. You'll see thick, pale yellow stems with large seed leaves just beginning to open. The yellow color is expected and normal.
Within 24–36 hours of light exposure, the stems will green up and the seed leaves will fully open to their broad, flat form.
Switch to bottom watering: pour water into the outer solid tray and let the mat absorb it for 20–30 minutes. Sunflower microgreens drink significantly more water than smaller varieties — check the mat daily and water every 1–2 days.
Step 5 — Harvest (Days 8–12)
Harvest when the seed leaves are fully open and deep green. Cut just above the mat surface with scissors. Some seed hulls may still be attached to leaves — shake or brush lightly after cutting. Rinse in a colander under cool water to remove remaining hulls.
Store refrigerated in an airtight container lined with paper towel. Sunflower microgreens last 5–7 days after harvest.
What Sunflower Microgreens Taste Like and How to Use Them
The flavor is nutty, slightly sweet, with a faint echo of sunflower seed — and a satisfying crunch that no other variety delivers.
Grain bowls. Sunflower microgreens are substantial enough to be the primary green base of a grain bowl. Layer: warm farro or quinoa, roasted sweet potato, tahini dressing, and a generous pile of sunflower microgreens. The crunch and nuttiness complete the bowl.
Avocado toast. Press a thick layer of sunflower microgreens into avocado toast before other toppings. They hold shape better than delicate varieties and add significant textural contrast.
Salads. Use as the primary green in a dressed salad. They hold shape well in vinaigrette and pair naturally with lemon, olive oil, and sharp cheeses.
Sandwiches. Sunflower microgreens replace lettuce on any sandwich with better flavor and crunch. They won't wilt under a hot protein the way lettuce does.
Multi-variety pairing. Sunflower microgreens pair beautifully grown alongside broccoli and pea shoots — the contrast of sizes, textures, and flavors creates an impressive mixed harvest. Start trays staggered by a few days for a continuous rotation.
For more on building a microgreens growing rotation, see: Pea Shoot Microgreens: The Complete Beginner's Growing Guide and How to Grow Broccoli Microgreens at Home.
The Best Setup for Sunflower Microgreens
The Aquager Microgreens Starter Kit provides the tray and grow mat. For the weighted blackout phase, use the solid-bottom outer tray stacked with a cutting board and books on top — no additional equipment needed.
Add Sunflower Black Oil Microgreen Seeds and consider also adding broccoli seeds and pea shoot seeds to run a three-variety rotation — staggered by a few days each, so you always have something at or near harvest.
Frequently Asked Questions
Why is the weight so important for sunflower microgreens?
Sunflower seeds are large and heavy. Without downward pressure, they tip sideways as the stem pushes upward, creating bent S-curved stems. The weight forces stems to grow straight up and helps push off the seed hull as the shoot emerges. Without weight: crooked stems with hulls attached. With weight: straight, uniform, clean harvest.
What if seed hulls are still attached after harvest?
Common and normal. Shake or brush the harvest lightly after cutting — most hulls fall off. A brief rinse in a colander removes the rest. If many hulls remain, give the next tray an extra day before harvesting.
How long do sunflower microgreens take to grow?
8–12 days from soaking to harvest. The weighted blackout phase takes 4–5 days; the light phase another 4–7 days. Warmer temperatures (70–78°F) speed the process.
Can I grow sunflower microgreens in soil?
Yes — a shallow layer of potting mix (1–1.5 inches) works. Grow mats produce a cleaner harvest (fewer hulls, no soil in the greens) and are easier to manage.
Can sunflower microgreens be grown alongside other varieties?
Yes — and this is highly recommended. Sunflower, broccoli, and pea shoot trays started on a 3–5 day stagger gives you a continuous mixed-variety harvest rotation.
The Microgreen That Changes How You Think About Garnishes
Sunflower microgreens are the variety that converts people who thought microgreens were just decoration. The visual impact of a full tray, the satisfying crunch, and the nutty-sweet flavor make them genuinely worth growing — not as a novelty, but as a recurring part of how you cook.
The only non-obvious technique: weight during the blackout phase. Every other variable is forgiving.
Sunflower Black Oil Microgreen Seeds and the Aquager Microgreens Starter Kit are all you need to start your first tray. For a full variety comparison by nutrition, see: Microgreens Benefits: The 7 Most Nutritious Varieties, Ranked by Science.
Author: Aquager | Published: May 29, 2026 | Updated: May 29, 2026


0 comments